

- Becoming a NMR User
- Field Cycler NMR
- SampleCase
- IconNMR Automation
- Data Transfer/FileZilla
- Checking Sample Temperature
- High/Low Temp. Experiments
- Non-Uniform Sampling (NUS)
- Troubleshootings
- Miscellaneous
- Safety Policy
To become a NMR user of the facility, he/she needs to
- complete the new account info form to open an NMR account.
- agree to abide by the safety policy.
For self-operation
- New users are strongly recommended to attend NMR courses (CHEM471, BCHM669) provided by the Department of Chemistry and Biochemistry
- New user must demonstrate proficiency in practical NMR operation, or attend the NMR training provided by the facility.
NMR Trainings (A training fee will be charged per user for the basic training session starting 09/2022)
- Basic NMR trainings at BioNMR Facility
- Experiment set up (2 hours, mandatory to most of new users ):
- Sample and Experiment Preparations
- Basic 1D and 2D Experiment Setup, oriented to the user's applications.
- CP800 Operation Walk-through (30 mins)
- File structure and permission differences in Linux system
- NMR operation differences on CP800 comparing to 600MHz spectrometers at the facility
- High temperature experiment
- Experiment set up (2 hours, mandatory to most of new users ):
- Additional training sessions are available upon request.
- 2D NMR Experiments: SOFAST-HMQC, HSQC, HMBC, 2D TOCSY, 2D NOESY
- CARA (Computer Aided Resonance Assignment): Project Setup and Spectrum viewing, Sequential Assignment using CARA
- DOSY Experiment
- Saturation Transfer Difference Experiment
- Relaxation Measurements
- Triple Resonance Experiments for Protein Structure Determination
- ICONNMR, multiple sample and multiple experiment set-up
Data Processing Computer
A Data Processing computer is available in the lab. Data can be transfered from Spectrometer computers to this computer for further processing and viewing in TopSpin. This computer also has its own IP address to facilitate data transfer to another computer. Details of operation are posted next to it.
Field Cycler (FC) on NMR600
Cautions:
- No labeling wrap on the NMR tube. Otherwise the tube diameter is too large for the sample holder.
- Precise NMR tube packing. It should be precisely 17.4 mm from the bottom of the o-ring or parafilm to the bottom of the NMR tube. Subsequently in the sample holder it should be 15.2mm from the bottom of the tube to a reference line on the sample holder. Otherwise sample loading will fail.
- Measure the sample length before loading the sample. If it is greater than 40mm, set to 40mm in FCNMR program. For samples in a shigemi NMR tube, the sample length should be two times of the distance from the center of the sample to the end of the shigemi tube.
- Gentle and careful handling the NMR tube, the sample holder and the shuttle in all steps.
Regular/non-FC users
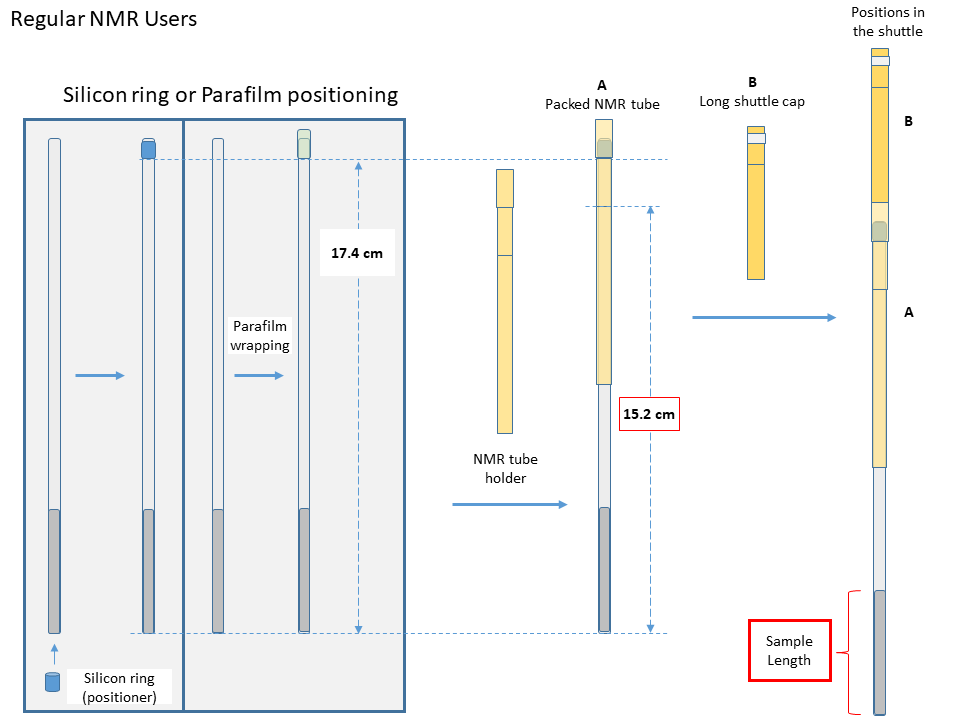
- Pack the NMR tube. The distance from the parafilm to the bottom of the NMR tube should be precisely 17.4cm.
- Open FCNMR program, location: C:/FCNMR/bin/Debug/FCNMR.exe. You may create a shortcut by "Send to Desktop".
- Choose the COM number, not COM1. In Status block, both USB and COM should be blue. The USB may need a reset to turn it from grey to blue.
- Lift the shuttle up by click “UP”. The shuttle will move to the top for sample loading.
- Gently insert the packed NMR tube (A) into the shuttle.
- Put the long shuttle cap (B) inside the shuttle, and push the cap down gently till it can't move.
- Type in the sample length, the maximum input value is 40mm.
- Click “Load Sample” to lower the shuttle into the magnet.
Alternatively use the "down" command to load the sample if you are getting errors from the FCNMR. This works well with a true sample length greater than 40mm. For better shim result, lower the NMR tube slightly further so the round bottom of the NMR tube is not part of the 15.2mm measurement. - Run a simple topshim first, and observe the sample poistion in the shim report. The value greater than 0.1 may suggest that the sample position is too high.
- If possible, try to have more than 40mm sample length, to reduce chances of measurement or loading errors.
- Move the bottom of the NMR tube slightly below the 15.2mm. Sometimes this will help with the shimming
Tips
Field Cycler Users
- Recommanded NMR tubes
Wilmad SKU:524-PP-7, OD: 5mm, Length:7”, medium wall or Wilmad SKU:528-PP-7, OD: 5mm, Length:7”, standard wall. Two different diameter inserts are available for those two specific types of NMR tubes. The medium-wall NMR tube is highly recommended for beginners because of its durability. - NMR tube packing
- Move one silicon O-ring from the bottom of the NMR tube to near its opening. The distance from the O-ring to the bottom of the NMR tube should be about 17.4cm.
- Put the tube in the sample holder, and add the second O-ring from the bottom. Move the O-ring up until the sample holder can hold it median-tight.
- Adjust the O-rings until the distance from the holder reference line to the bottom of the NMR tube is 15.2mm.
- Choose an insert that fits the best to the NMR tube, and add it from the top.
- Adjust the insert position so its end is slightly lower than/submerges the sample surface. Remove any visible air bubbles in the sample that is below the insert.
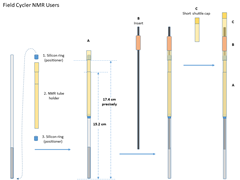

- NMR tube loading
- Place the red plastic plate on top of the magnet shim stack to close its opening. This is to prevent screws falling into the magnet
- Gently insert the packed NMR tube (A) together with the insert (B) into the shuttle, and then the short shuttle cap (C) until the whole sample tube assembly sit fully in the shuttle. The shuttle itself should be move.
- Fix the shuttle cap position with two flat-head plastic screws. A small screw driver is availabe in the FCNMR box. Handle ths screws carefully and also avoid over-tightening them, since the screws are plastic and very small.
- Remove the red plactic plate. Otherwise the shuttle will collide with the place when you start loading the sample.
- Check the sample tube assembly, screws, and the red plastic plate before the next step.
- Follow step 2 in Regular/non-FC users session to load the sample.
------ unfinished
Field Cycler related errors
- The grey COM or USB button in FCNMR window.
Make sure the COM option has been selected, and it should not be COM1. As to the USB connection, you may press the power button on the usb hub located on top of the computer case to reset it. The blue cable connector is COM and the white one is USB. - The ERR03 on the motor box during the sample loading process
You may click "Admin Mode", go to the Command and Log page, type in "reset", and then click "send" to reset the motor. After that, go back to the Shuttle page, move the shuttle up, check the NMR tube position and/or its packing. - No error during sample loading but TopSpin can not lock or shim well.
Veryl likely the shuttle possition is incorrect. The shuttle may need a position calibration or zero reset. When the sample/shuttle is down in the magnet, not on top, click "Home" when the Admin mode is active. Another possibility is that the deuterated solvent concencentration is too low. - Contact the facility director for assistance if any other error occurs.
Cautions/Notes:
- NMR tube length limit. Position of the upper injection tube limits the length of NMR tubes in the SampleCase. A Shigemi tube should have less than 400uL sample. Use manual injection procedure below for special long NMR tubes.
- Available spinners. Two room-temperature spinners are designated for CP800. Please do not use them on other spectrometers. More spinners are available upon request for multiple sample experiments in automation mode.
- Quitting IconNMR Automation mode. To be able to set up an experiment manually in TopSpin after IconNMR automation, you must first click on "Stop" in IconNMR Automation window.
Single-Sample Loading Procedure
- Put the sample NMR tube with spinner in any sample position in the Carousel Unit.
- If the sample is in position 5, type the command "sx 5" in topspin to inject the sample. Alternatively you may press the blue Rotation button on the Carousel to move the sample to the injection position under the injection tube, then press the green Inject/Eject button to inject the sample.
- If you are ready to run another sample in position 8, simply type "sx 8". The previous sample will be ejected, and the new sample will be rotated and injected into the magnet.
- To eject a sample, use command "sx ej", or press the green Inject/Eject button on the Carousel.
- To remove the sample from the Carousel Unit, first press the blue Rotation button on the Carousel to rotate the sample away from sample injection tube. In this way, you will avoid accidently breaking the sample tube due to limited space between sample holder and sample injection tube.
Multiple-Sample Experiments Setup
Please choose IconNMR from the left side panel for details
Manual injection procedure for long NMR tubes that won't fit in the SampleCase
- Type "ha" in TopSpin to open Hardware Address window.
- Click "open" in BSMS block to open BSMS Service Web.
- Choose Sample handling, then Sample Transporter Control page.
- Switch Lift Mode to Standard BSMS Lift, and then click on "set" button to confirm.
- Now you may manually load the sample on top of the magnet using commands "ej" and "ij" .
- After finishing your experiment, switch Lift Mode back to "SampleTransporter:PLC on TTY1 of ELCB1" from the same Sample Transporter Control page.
IconNMR Automation: Multiple sample experiments setup (CP800)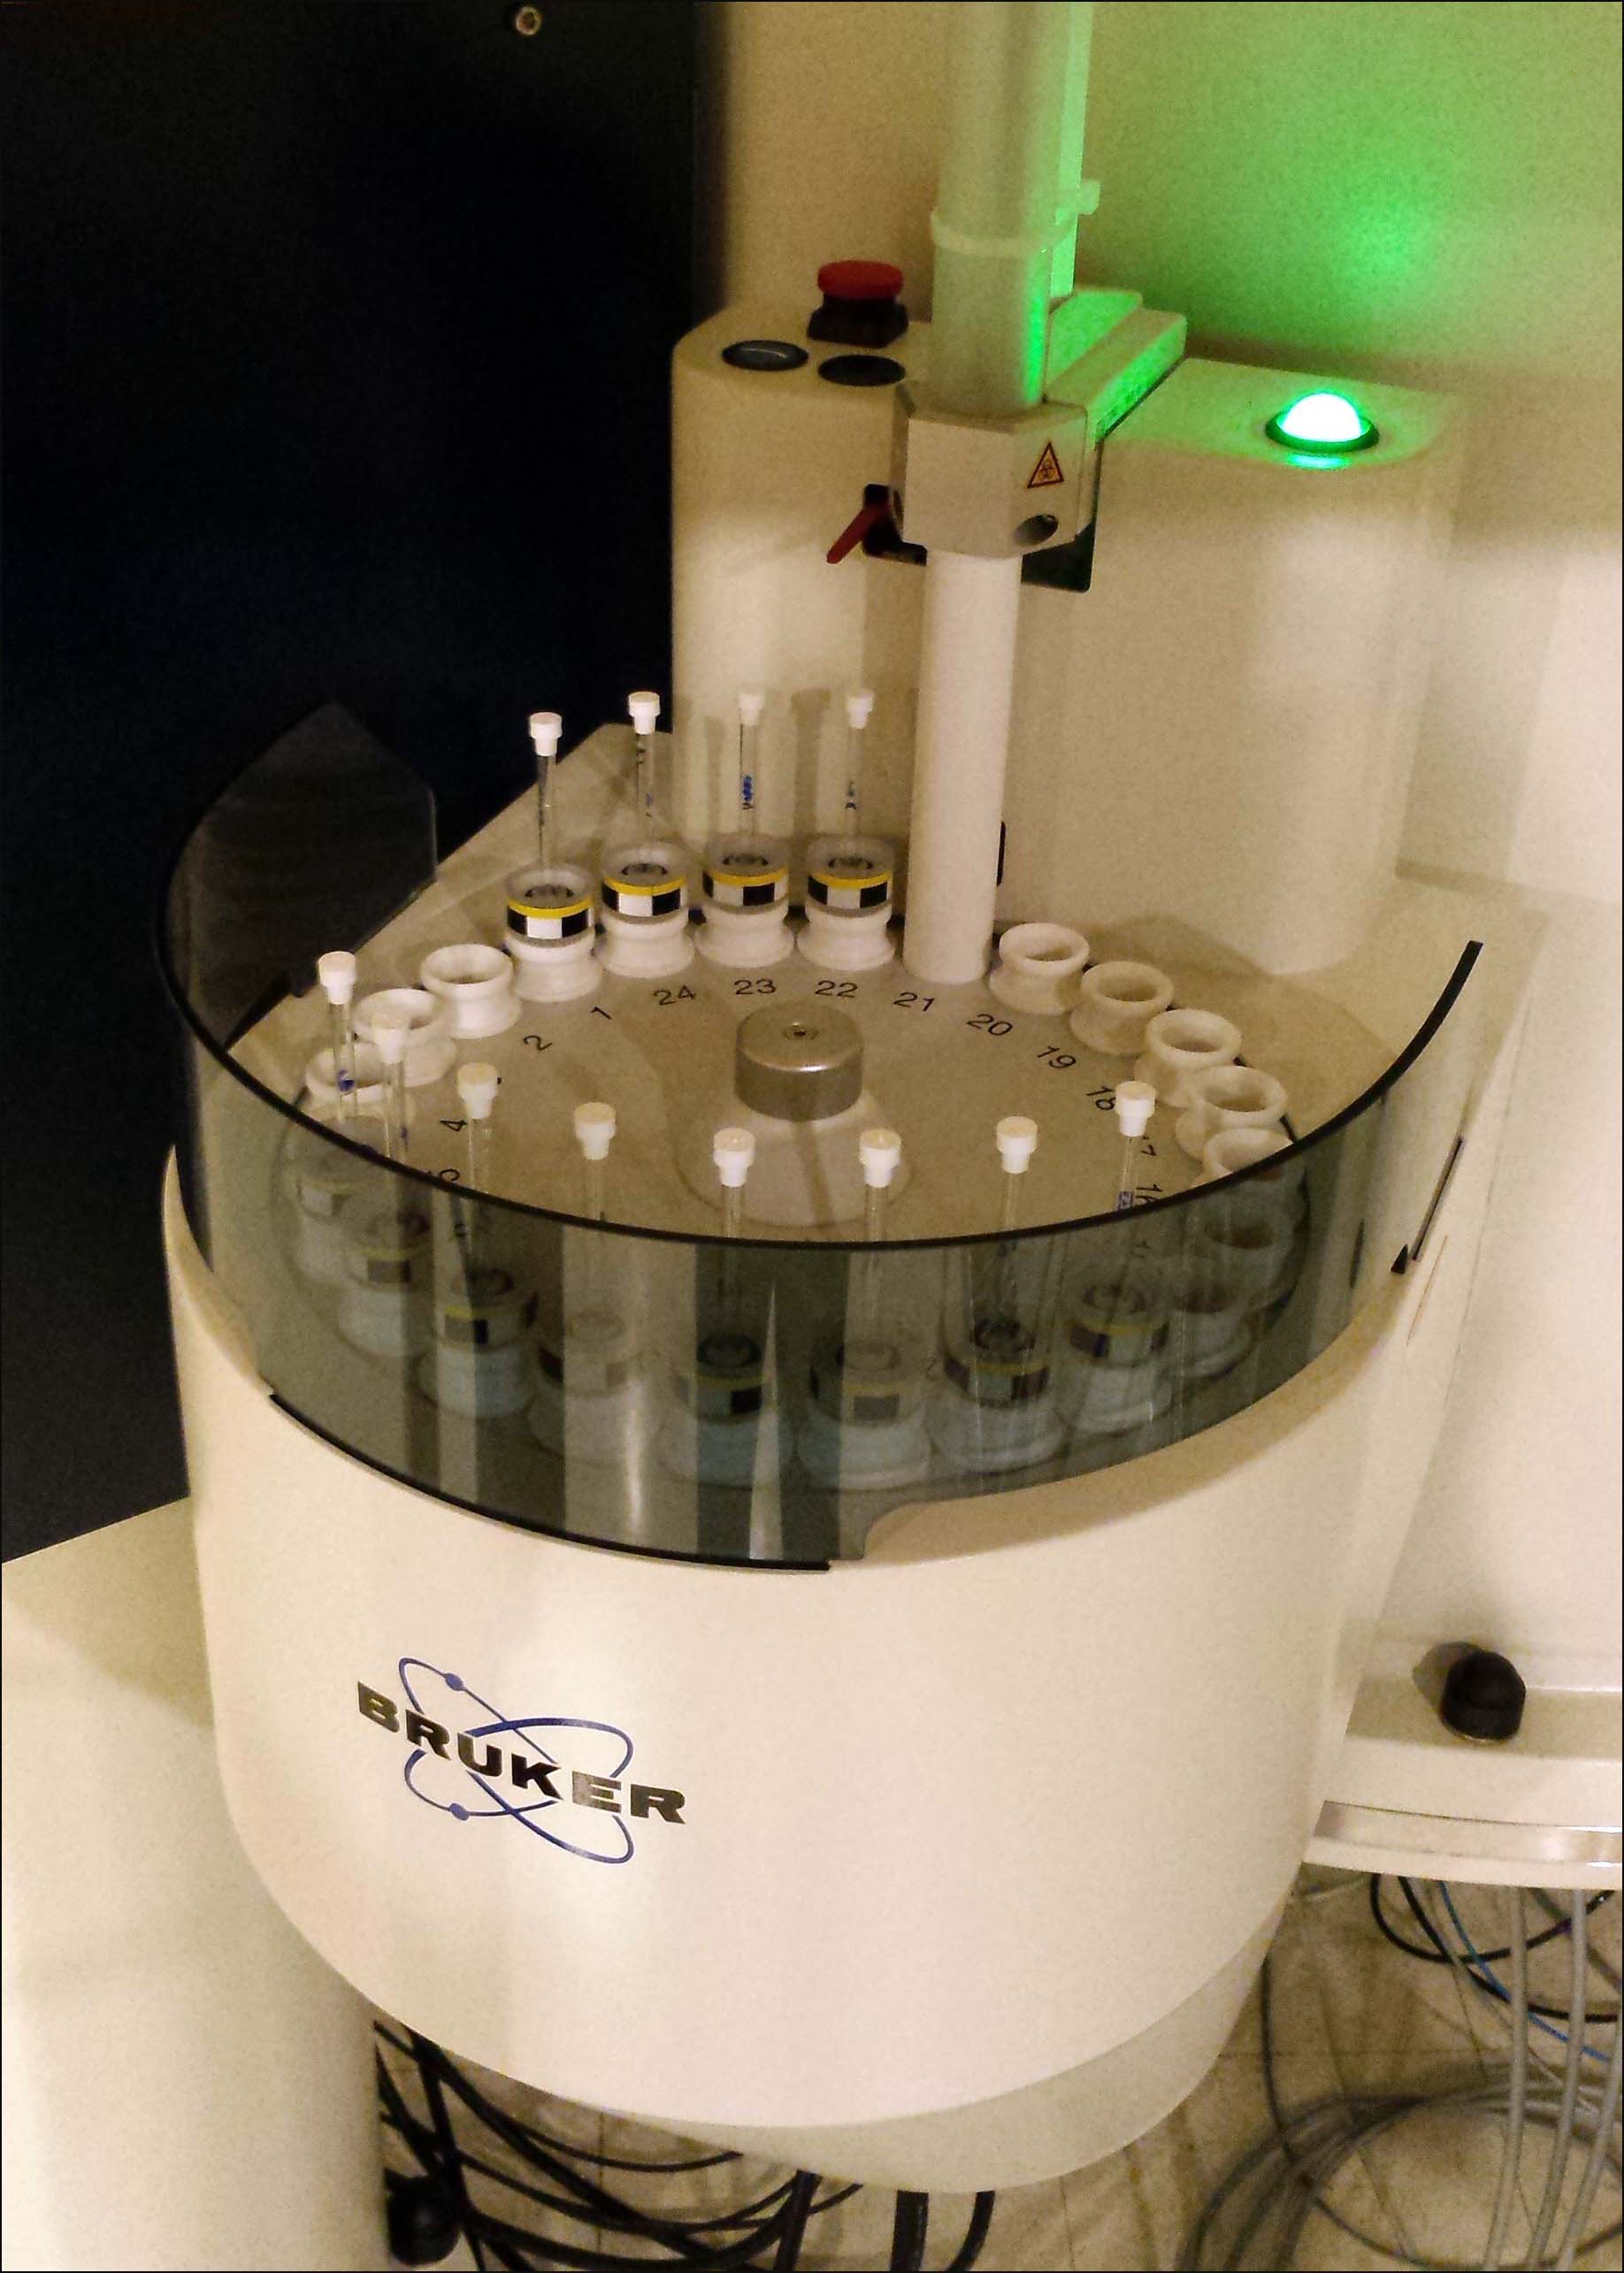
-
Put samples with spinner in the carousel sampleholder, and record the corresponding positions of all samples.
Inject the first sample, lock, shim, tune and match the sample, and run a pulsecal to estimate the P1 of the first sample.
-
In TopSpin, type "iconnmr" or "icon" to open IconNMR interface.
- Optional! If samples need certain time to equilibrate at the target probe temperature, you may want to set/adjust temperature equilibrium time. Open ICONNMR Configuration page, and find Temperature handling/Post TemSet Routine. The default is TEREADY 60 0.1. The 60s is the time delay after the probe reaches the target temperature. You can change the 60s to a time in seconds that you prefer.
-
Select "IconNMR Automation", then select user.
Select "IconNMR Automation", then select user.
-
Double click the holder number which has your first sample.
-
Change/edit the following information if necessary
(1) Disk and Name:
Data location = Disk + \data\login account\nmr\Name
Examples:
To the login account NASA, and we name the experiment set by the date, for example 01052020
- If the NASA account is under the default C:\Bruker\TopSpin4.07 (the Disk setting),
NMR data will be saved under the following path: C:\Bruker\TopSpin4.07\data\NASA\nmr\01052020.
- If the NASA account is under G:\Bruker\NMR_data (the Disk setting), NMR data will be saved under the following path: G:\Bruker\NMR_data\NASA\data\NASA\nmr\01012021.

(2) Experiment number: Check the data folder first. You may set any number but make sure it won't overwirte any existing important data..
(3) Solvent: it should be the deteurated solvent in the sample.
(4 )Experiment: Please read carefully the description of the experiment to make correct selection.
(5) Priority: not necessary to set it if you submit the experiment in your desired order.
(6) Parameters:
(a) Acquiision parameters. You may click on
 icon to edit a set of specified parameters. Or go to the top menu bar and select /parameters/Edit all acquisition paramenters, which is open the AcquPars window in topspin. After editing, you can click on Return to IconNMR to go back to Automation window.
Note that you should set temperature here (TE). When IconNMR automation starts, a window will pop up asking you whether you want temperature be regulated. If one temperature will be used for all samples/experiments, make sure set that temperature to all entries.(b) Locking, Shimming options. You may change the settings by clicking on
 . I recommend NOT to tune and match X-channels, if you will adjust it before starting the automation.
 (7) Title
(9) Click on “Add” to add more experiments to this specific sample. Right click the experiment, you may also see "Iterate" option, which allow you to copy the same experiment including customized parameters.
- If the NASA account is under the default C:\Bruker\TopSpin4.07 (the Disk setting),
NMR data will be saved under the following path: C:\Bruker\TopSpin4.07\data\NASA\nmr\01052020.
-
The “Copy” option allows you to copy the already set-up experiment to the next holder number/sample, and then edit only what is necessary. Repeat this step to cover all the holder numbers that have samples. Use "Delete" option to remove entries that have no samples.
-
Review all the experiments that have been set up. Highlight the holder number, then click “Edit” will allow you to modify that experiment.
-
Highlight the holder number then click on “Submit” to add the experiment to the queue one by one. You may highlight multiple holder numbers at once.
-
Click “Start” to run the queued experiments. You may still any experiment that has not been running yet.
-
At the end, you must quit the automation mode by clicking on the stop icon “
 ” . After that, you can set up single experiments in TopSpin window, which is the "manual mode". Note that there may be a bug in the iconnmr and you won't be able to quit/close iconnmr window or TopSpin, and you have to log out from your account to terminate the program.
2D experiment 1H SW adjustment
By default, the 2D experiments in iconNMR will create and run a 1D proton experiment to be used as a reference to SW optimization. You may choose an existing good 1D instead, or set ns in the 1D experiment properly so all signals of interests will have reasonable/good intensities. Alternatively, an normal/N version (opposite to the composite/C) of any 2D experiments can be created for 1H SW manual adjustment in iconNMR.
Data transfer using Filezilla Client program
1. Open Filezilla, go to File/Site manager, and create an New Site for frequent use. |
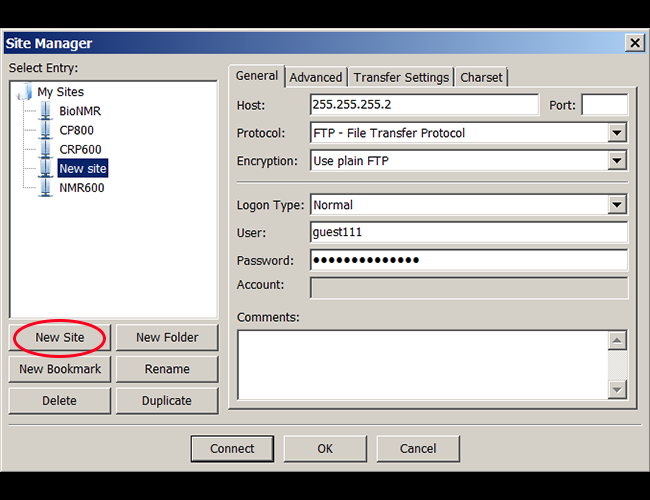 |
2. In Filezilla main window, click on the icon "open the site manager", and choose the remote computer you want to access. |
|
3. If all the information in the site-manager was correct, you should be able to see files from the remote computer. |
|
4. To transfer files, go to the desired file directory on both local and remote sites and copy the files. Note that you may not have the write permission on the remote site. |
Possible Filzezilla related issue
Problem: NMR Spectrum does not show correctly in TopSpin after the data was transferred by FilleZilla
Cause: The ser file may have been altered during transfer. If so, in the desination folder you will see a different size ser file.
Solution: Go to FileZilla Client menu, Edit/Settings/Transfers/File Types, change Default Transfer Type to "Binary", and uncheck Treat files without extension as SCII file. Then re-transfer the data.
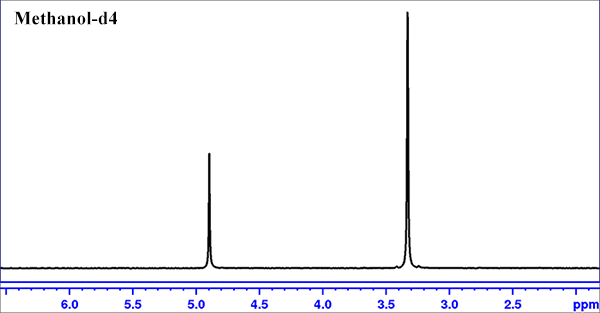
- Load the 99.8% Methanol-d4 Bruker reference sample.
- Lock on Methanol-d4.
- Do a round of "topshim"
- create a zg30 experiment set; Click on "getprosol" icon to use default pulse length and power level; Set ds=0, ns=1, rg=1.
- Type "zg" to run the experiment, and then "apk" to process the data.
- type "calctemp D" to obtain the calculated probe temperature. Ideally the calculated temperature should be very close to the settting temperature.
You may use the following procedure to validate the setting temperature, ranging from 282K-330K. Temperature correction is routinely checked by the facility Note that temperature correction is usually being enabled which should not be altered by users.
High Temperature Experiment (CP800 Spectrometer)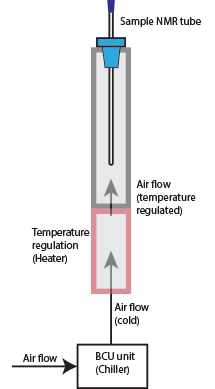
CP800 NMR Spectrometer is equipped with a special CPQCI probe which can run high temperature experiments. To set up a high temperature experiments, you need to know the followings:
-
The CPQCI probe has operating temperature range from 5 °C-105 °C.
Alert! The heater power can only increase the probe temperature to about 105 °C. The heater power reaching 80% will trigger the cryoprobe to warm up! -
Use a ceramic spinner for experimental temperature higher than 50 °C / 323 K.
- The maximum temperature should be at least 10 °C below boiling point of the sample solvent.
- Set BCU/Chiller power to OFF when you run high temperature experiments, and set it to Medium when lowering the probe temperature back to room temperature. Do not set BCU power to Maximum to cool a hot probe.
- Increase temperature in two steps. First set the temperature about 15°C below the target temperature, let it settle there and then step your way up to the end temperature.
Low Temperature Experiment (CP800 Spectrometer)
To run a low temperature experiment, such as at 5 °C, you may need to set BCU / Chiller power to MAXIMUM in temperature control window.
Non-Uniform Sampling (NUS)
Data Acquisition, Run 'nusPGSv3' for better data point sampling! Note that the script won't work in a NMR folder that its name has a gap or space in it.
- In TopSpin AcquPars window, change the FnTYPE to be 'non-uniform_sampling'. You don’t need to set anything in the NUS parameters block.
- Type 'nusPGSv3' to create a data sampling schedule. Several questions will be asked along the way.
- Random Seed
- - 0 is default and probably what you want.
- - 0 implies the random seed used for random number generation will be selected by the computer.
- - Any other number here means you will also get the same sequence. So lets say you want to compare two acquisitions but are not interested in the differences that might result from sampling differently.
- Sine portion for sampling
- - 2 is default and probably what you want.
- - This is not the place to describe what this means. 2 will result in more points towards the front of the schedule and this is probably best for you. 1 and 0 are experimental and we don't suggest you use them unless you know why you want to.
- Number of points to collect (complex points)
- - When set 128 out of 1280, it is 10% sampling amount. 10% of the current numbers of linear, complex points is selected by default.
- - When running a 2D experiment, you probably want this to be more like 25%. 10% of all the complex points should work for a 3D experiment. 1-2% should work for a 4D. Note that the number you put in here is the total number of points to be sampled, not the percentage.
- Tolerance (as a percentage).
- - 0.01 % is the default. This means the generator must generate the number of points requested above +/- 0.01%. Most likely this means it will generate exactly the number you asked. Sometimes it is hard for the scheduler to find the exact number of samples you ask for so you may need to add some tolerance here. Try changing it to 10%.
- Shuffle the schedule (0 = no, 1 = yes)
- - Default is 0 which means the schedule will be generated with the left most column being "fast" and the right most column being the slowest. I suggest this for starting out.
- - Select 1 will shuffle the schedule. It is perfectly fine to do this as the reconstruction processing will reorder everything in the end anyway. However, note that the first point, (0 or 0,0 or 0,0,0) will always remain at the top.
- - At the end there should be a message” Poisson gas sampling schedule setup finished.”. A nusPGS_setup.out file will be generated into the data directory.
- Collect data with the 'zg' command. The schedule used will be deposited into the data directory with the name 'nuslist'. You can use this schedule as is during reconstruction with hmsIST.
NUS data processing
To process the spectrum, go to ProcPars page, and at NUS section, set MDD_mod to either cs or mdd (cs may give better result).
- 2D data processing (TopSpin 3.6 and above, does not require a NUS license)
- Type 'efp' and phase the 1D spectrum. Most likely only PHC0 needs to be adjusted.
- Copy the phasing parameter of the 1D (PHC0) to the 2D. You may or may not need to add 90 degree to the PHC0 depending on the experiment type. Trial and error!
- 2D HSQC: PHC0 in 2D = PHC0 in 1D +90
- 2D TOCSY: PHC0 in 2D = PHC0 in 1D
- Phase the 2D spectrum using 'xfb' command
- 3D data processing
- nmrPipe methods. https://www.ibbr.umd.edu/nmrpipe/nus.html, or http://gwagner.med.harvard.edu/intranet/hmsIST/234Proc.html.
- TopSpin method (Requires a TopSpin NUS license)
The workflow is to extract a 2D plane from the NUS 3D data, and then extract the first row 1D from the 2D plane. Phase the 1D spectrum and obtain its phase parameters. Apply the phase parameters to 2D and adjust PHC0 if necessary to obtain a good 2D spectrum. After that copy the 2D phase parameters to the 3D data, and process the 3D data.
- Open the 3D NUS data set, type 'rser2D' to “Extract a raw plane”. By default a new 2D data set will be generated as expt # 999.
- At the 2D data set, expt# 999, type 'efp' to process the first FID, which has the process number 999 set by default.
- Phase the 1D spectrum, and record its phase parameters, PHC0 in particular.
- Copy the 1D phase parameter(s) to the 2D data set, add 90 to the PHC0 (which is needed in processing a 3D HNCO NUS experiment), and then type 'xfb' to process the 2D data. Signals in the 2D should have the correct phase. If not, removed the added 90 in PHCO and process again. The 2D plane will give you an idea how well the NUS data was acquired.
- Copy the 2D phase parameters to the 3D data set, and process 3D using the command 'ftnd'. “0” should be the option in the pop-up window.
- The 3D data processing may take a few minutes to finish, while its progress is shown at the left bottom corner of the TopSpin window. After it is done, to view 2D planes of the 3D spectrum, use the + , -, or the two way vertical arrow button to move the 2D plane.
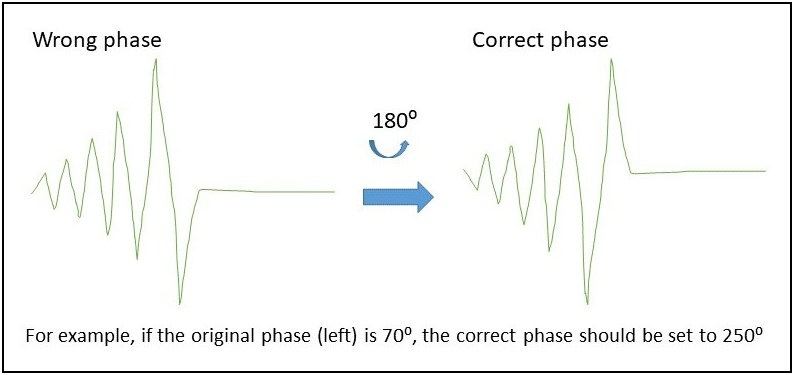
- Lock issue
- For single deuterated solvent, it could be a lock phase issue if topspin complaint not able to lock. The red and green lock signals should reach the maximum first before going horizontal. If the signal reach the minimum first before going flat, the phase is 180 degree off. You may open BSMS window/lock page and then adjust the phase parameter.
For a mixture of two deuterated solvents, you will need to decide which solvent to be locked on, or create a new solvent in the solvent table. Locking on wrong solvent will result in wrong chemical shift measurements.
- Poor shimming result
First of all, make sure you have a required volume of sample with sufficient amount of deuterated solvent. If not, it is very likely the shimming won't work well. The final B0 deviation should be below 1 Hz after shimming. If not, check whether the sample is inhomogeneous. Poor quality NMR tube, air bubbles, or insoluble substances can cause poor shimming. If the sample is fine, you may try to following options, then redo topshim.
- Use the Tune Before option "Z-X-Y-XZ-YZ-Z", even for a shigemi NMR tube
- Add z6 when setting up shimming
- Start from a good shim file. Type "rsh" and choose the latest 3D shim file of the specific probe (File name: TS3D_XXXXXX), and then run topshim.
- Manually optimize X, Y, XZ and YZ. After adjusting each dimension, optimize Z before moving to the next dimension.
- ADC overflow error
Most likely the receiver gain/RG was set too high, causing poor quality spectra or no collected data. It may be necessary to type "ii restart" to reset the hardware after the error occurs.
RG should be set to a low hundreds even if "rga" gave a much higher number. And always monitor the experiment until it finishes the first scan before leaving the experiment running, just to make sure there won't be a "ADC overflow" issue. - TopSpin won't start
It is likely that the TopSpin is still open in someone else's account. Rebooting the computer is the solution. To reboot the computer, please do it from the computer desktop/screen instead of pressing the power button on the computer case. - CP800: Sample got stuck in the SampleMail system. Using TopSpin command "ej" or "ij" won't bring the sample down to the magnet or the sample injection compartment.
The sample NMR tube is probably stuck on top of SampleMail vertical tube. You need to get on the platform, locate where the sample is. Note that the spinner can not be taken out from top of the delivery tube. You may carefully remove the sample NMR tube from the spinner, then unlock the mechanic switch (which holds the spinner) so the spinner can drop back to the injection compartment.
- CP600: Power outage ( during a thunder storm) caused Cryoprobe to warm up (emergency warmup mode); helium compressor stopped working.
Once the system started to warm up, you may press cool-down button on one side of Cryp-Platform. If you does it quick enough, you may be able to force the system to cooldown instead of warmup, and the system will be ready for use in a few minutes. If it is too late and the system indicates that it needs to warm up first, then you will have to wait the system to warm up before you can cool it down. Overall it takes about 6 hours.
In the emergency warmup mode, sample lift will also be activated, which can not be stopped until the system is completely warm or cold. Once the probe is warm or cold, you can uncheck the " Window locked" from the cryopanel windows, then close V13c (emergency lift).
Emergency warmup mode may also switch off the heater unit. You should check/turn on the heater from Topspin temperature display window.
- A NMR tube appears too loose for the spinner, and/or good shimming is very difficult to achieve.
It is possible that the NMR tube is not suitible for the 600 MHz or 800 MHz spectrometer. Please use high frequency/quality NMR tubes, ≥500MHz. A temperary solution for a loose NMR tube is to put a thin strip of Scotch tape on the NMR tube where the spinner will hold the NMR tube, and careful push the NMR tube through the spinner.
- CP800: Poor resolution at high temperature
One reason is that the sample may not have reached full equilibrium. Running a topshim before every long experiment is recommended. You may run a quick 1D experiment once in a while and compare with the previous ones. Another reason could be air flow flucturation. If you see unstable air flow, +/- 5 L/h to the setting air flow, please report to the facility manager.
Miscellaneous
-
Excel file NMR_title_files.xlsm, updated 07/2020.
This excel file can help to document and organize all your NMR experiments by saving all the title files in an excel sheet.
Function: Search the "title" files from a selected folder, and collect title contents in a Excel worksheet.Instructions:
1). Make sure the Microsoft Excel program on your computer is macro enabled. Instruction available in the excel file.
2). Download and open the Excel file.
3). Press the search button.
4). In the browsing window, navigate to the desired NMR data folder, and click on OK.
5). In the pop-up search window type in keyword "title". The Macro will then generate a title list with path and the content in the title files.
NMR Lab Safety Policy
Safety Policy Environment and Safety in Biomolecular Nuclear Magnetic Resonance Facility, University of Maryland, College Park: Responsibilities, Risks and Liabilities:
-
Staff members, Teaching Assistants, and Users will expose themselves to strong magnetic fields (maximum of 14 Tesla) from the NMR superconducting magnets, while they are working around the spectrometers. To the best knowledge of the NMR community, no known health hazard has been reported when one is exposed to such field, in the past twenty years. However, there is no guarantee that future findings may show otherwise.
-
Any person with metal implants, such as heart-pacers, should not work or enter the NMR labs. The strong field and the radio frequencies of NMR spectrometers are known to interfere with heart-pacers.
-
Keep all loose metal objects at least ten-foot from the magnets. The strong magnetic field attracts any loose paramagnetic metal objects nearby. The collision force is so strong that it can induce a structural collapse of the magnet, which in turn causes spontaneous boil-off of the super-cold liquids in the magnet. A person around the collision (magnet) can be injured.
-
Use proper procedure and obey safety policy when dealing with liquid nitrogen and liquid helium. Then superconducting magnet contains liquid nitrogen and liquid helium. Contact with these cold liquids will cause severe burns to the body. Safety policy must be complied with during transportation and refilling of the magnet with these liquids. During the refilling of liquid helium, the operator must be very careful and always maintain proper balance when stepping up to the platform (no more than 3 feet in height). Falling from the platform could lead to body injuries.
DISCLAIMER:
The prospective users should read ‘responsibility, risks and liabilities’ and fully understand the potential danger, implication and risks described. The staff members in the NMR facilities, the Department of Chemistry and Biochemistry or the University of Maryland is not responsible or liable for any possible misshape caused by any user negligence. By reading this, the users will behave responsibly and follow all the proper procedures as described in this form and the published NMR facility policy of the department.
| COPYRIGHT © 2013 Biomolecular NMR Facility, University of Maryland, College Park | | Contact: Dr. Daoning Zhang |